Showing posts with label template. Show all posts

Sunday, May 29, 2011

A Gift for You

I found an old template I made a couple of years ago and thought I'd share it with you guys, so here it is: Ye Olde Template

Also, check out my awesome friend Natalie's new inspirational blog, Don't Hide Yourself in Regret. She's a real sweetie who managed to go from newbie member of Purdue University's student organization Los Latinos to president of said club in less than a full year. Love her to pieces.

Anyway, I'm feeling pretty down today because my distant cousin and childhood friend, Jose, passed away at the tender age of 23, so I haven't felt like doing much. Decided to just take some photos of the birds from my sofa.

Brunching Finch
Both shots were taken from behind a screen, but it's most visible in the bottom one. I love what the screen did to the bokeh. Kind of fun!

Originally titled "When in Rome" because she happened to match the foliage perfectly, but the computer brought out more yellows than were visually present. Ah well. She's still a cutie.

Friday, April 22, 2011

Template Tutorial: Part 2


Last time, I taught you  how to make a very simplistic, basic template using shapes and clipping masks. Now, it's time to spice it up!


Find a texture that you really like and place it over the background layer. I chose this texture by DyingBeautyStock because it seems universal enough for my needs.

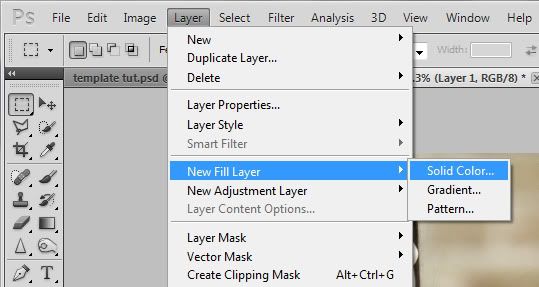
If you want to change the color of the texture, you can use whatever method you want. Personally, I'm going to use the non-destructive method of adding a Solid Color fill layer over the texture in whatever color I want and setting its blending mode to Hue. That way I can change the color again any time I want in the future.

Add a layer mask to the rectangle layer. (Layer -> Layer Mask -> Reveal All) Use an interesting brush-- in my case, a grunge brush-- that is black and set to 100% Opacity to brush away the side in whatever fashion you please. Diagonally tends to be most interesting. Vary the opacity and the brush itself to make a fun, unique edge. Don't lose too much, though! You don't want to lost your background photo. If it helps, you can hide the overlapping layers so that you can see more of what you're doing.


Experiment with this method on the other three shapes too, but take care to remember not to mask too much away. Keep your black brush's opacity low.


Just for fun, I'm going to add a thin rectangle across the bottom to add sort of a ribbon effect.


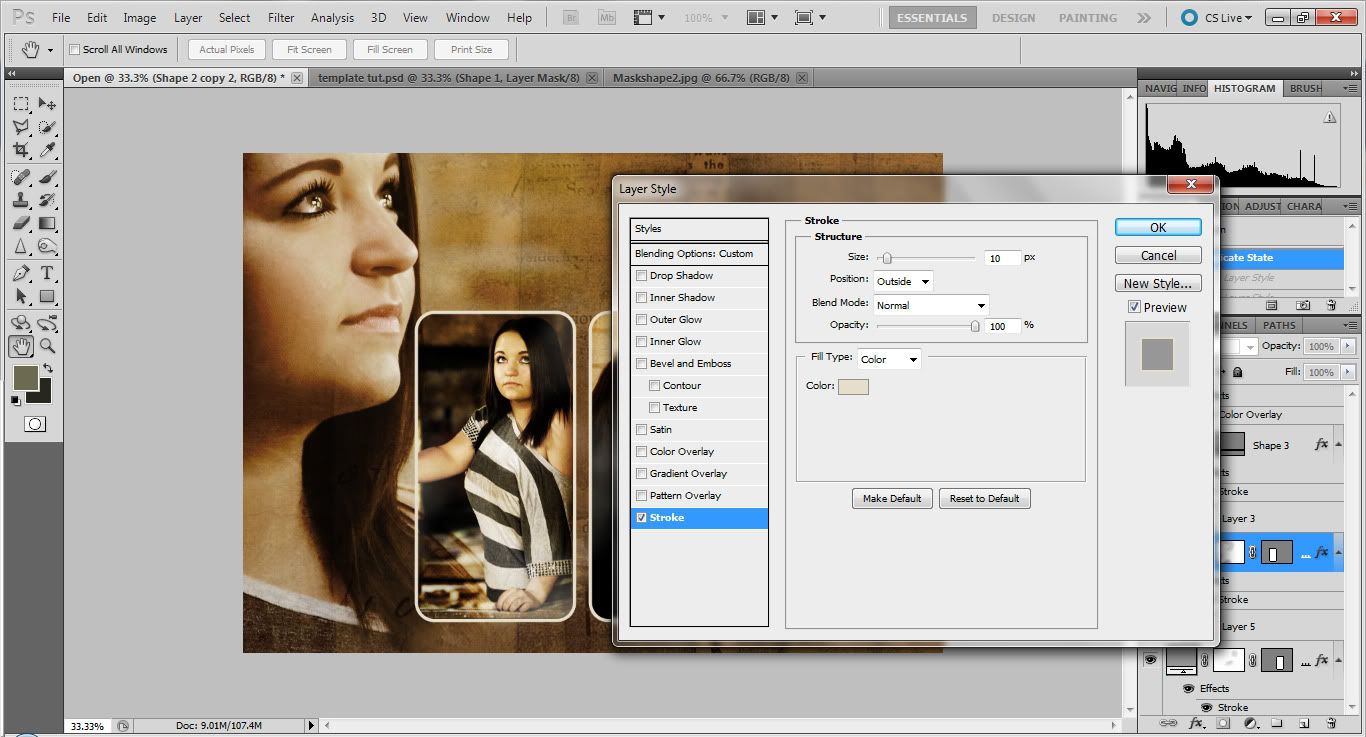
The rest is up to you! Embellish where you want, adding borders or text or even other little shapes to make the template your own. I personally recommend changing the layer styles so that the photos and the background texture will match better. In my case, I changed the blend mode of the main shapes to Hard Light and then added a border called a Stroke to everything, including the ribbon.

I also changed the ribbon's blend mode to Darken and darkened the edges of the whole thing by creating a new layer, using a soft black brush to paint over the edges, and then changing the blend mode until I was satisfied. Here is my finished product minus text.


Remember that text follows the same basic rules as photos: play with the blending options and don't be afraid to experiment with Strokes!!! You can get some very interesting results.

Wednesday, April 13, 2011

Template Tutorial: Part 1


The key to making a template is to make everything impermanent. It may be a challenge, but there's always a way to make a change temporary in Photoshop. You just have to find loopholes!

A template starts with a blank white or black canvas. I started mine with a 5x7, 300 px resolution white canvas because 5x7 is a nice, standard photo size that can easily be changed to either 8x10 or 4x6.

Let's begin with something simple. Using your rectangle tool, make a shape that covers roughly three-fourths of the canvas in the opposite color (for instance, I have a white canvas, so I'm making a black rectangle.)


Now, make another shape in gray. This can be any shape you want from the Photoshop presets. It should be between half and two-thirds the height of the canvas and however wide as you see fit. You can always change the size as we go. Place it where you think a photo would look nice.


Use Ctrl+J or Command+J to duplicate the layer twice. Line the three objects up so that at least two overlap your black rectangle. Look! We already have some sort of design. This is technically already a generic starter template.


ADDING PHOTOS


Place your photo over whichever shape you want it to occupy. Resize as needed.

With your cursor on the line between the photo and the shape layer, hold down your Alt key and click the line. This is called creating a Clipping Mask. The photo will only show up where the shape is. you can move the photo around to get the correct placement.


From now on, any changes you make with the shape layers will be applied to the photos. For instance, if you change the gray layers to "Hard Light", the photos will appear to be set to Hard Light although they are still normal photos. You can change the Blending Options any time you want.


Part two will come soon enough. For now, experiment with this method. Make your own different starter templates, and show me what you do! :)

Friday, April 8, 2011

It IS Alive!

Hey guys... I promise I'm still alive. It's been a strange week. I haven't been able to stay awake! Every time I wasn't in class, I was passed out on my couch. Heck, I even went to bed before 9 o'clock last night. Crazy for this night owl, I know!

Anyhow, I have been taking my photos of course. Tuesday's is of some new additions to our kitchen.


Wednesday's accidentally got deleted.  :'( I had taken a photo of my very first chalk drawing for my Drawing class, but when I went to open it, my sleepy self deleted it permanently. I'll retake the photo once I get to school on Tuesday since I left it in the cabinets there (so it won't get ruined. I'm good at ruining things if you can't tell.) In place of it for now, I'll show you some more photos from the Senior shoot. :)


Yesterday's photo is SOOC, lens vignette and all. I don't feel like editing more than I already have to.


And finally, we reach today's photo: a fly on a... something. Can you find the fly? I didn't until I opened this in Photoshop. LOL


Also, I wanted to give you a sneak peek at the template I'll be making a tutorial on. The tut is already most of the way finished, but I was half asleep writing it, so I want to make sure I didn't skip a bunch of stuff.


Again, I apologize for disappearing all week. I also apologize for taking so long on posting this tutorial. I hope it'll be worth the wait once it finally IS posted! If not, well, Sandra can just ask me for clarification since she's the one who suggested this tut anyway! lol :)